API Gateway Service 사용(Spring Cloud Gateway + Eureka)
Spring Cloud Gateway와 Eureka를 이용해서
API Gateway Service를 실행해보자
그렇기 위해선 FirstService와 SecondService, apigateway-service를 discovery service(Eureka)에 등록해야한다.

클라이언트가 " http://localhost:8080/first-service/welcome "로 요청을 보내면
API Gateway가 먼저 받는다.
이제 API Gateway는 " /first-service/** " 이하는 어떤 uri로 가야하는지 discovery service에게 물어보고 discovery service가 어떤 IP 주소와 포트로 가야하는지 알려주면 API Gateway는 해당 주소로 요청을 보내게 된다.
우선 first-service와 second-service를 discovery service에 등록시키려면 application.yml 파일에 유레카 클라이언트를 등록해야한다.


그리고 apigateway service도 discovery service에 등록한다.

참고로 lb는 load balancer 의 약자이다.
apigateway-service와
first-service를 다른 port로 2개 실행시키고
second-service 도 다른 port로 2개 실행시킨다.
그리고 discovery service를 통해 접속해보면
http://127.0.0.1:8761/

다음과 같이 apigateway-service 가 8000번 포트
first-service 가 8081, 9091
second-service 가 8082, 9092로 실행된걸 알 수있다.
이제 서버를 여러개 기동시켰을 때 랜덤포트를 사용해보자
참고로 랜덤포트(0)는 여러개 실행시키면 유레카 대시보드에서 하나만 보이기 때문에
first-service의 application.yml에 인스턴스 id값을 부여하는 옵션을 추가하자

그런데 만약 " first-service/**~ "로 요청을 보내면 2개의 first-service 중 어디 포트로 요청이 간건지 알 수 없다.
그러므로 이를 알 수 있도록 하나의 컨트롤러를 하나 만들어 보자.
@RestController
@RequestMapping("/first-service")
@Slf4j
public class FirstServiceController {

    Environment env; // 설정값들을 불러올 수 있는 클래스

    @Autowired
    public FirstServiceController(Environment env){
        this.env = env;
    }

	// ...

    @GetMapping("/check")
    public String check(HttpServletRequest request) {
        log.info("Server port ={}", request.getServerPort());   // request로 값을 불러올 수 있고

        return String.format("Hi, there. This is a message from First Service on PORT %s"
                ,env.getProperty("local.server.port")); // Environment 클래스로 값을 불러올 수 있다.
    }
}
컨트롤러를 만들고 테스트를 해보자
간단한 코드니 postman으로 테스트해보자
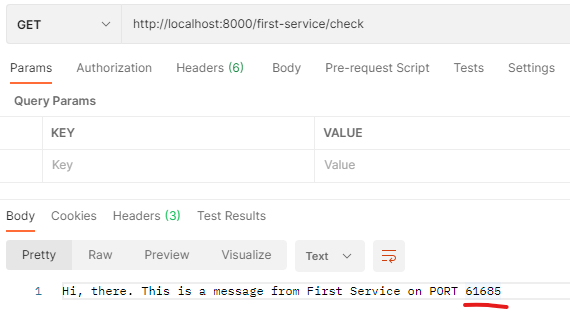
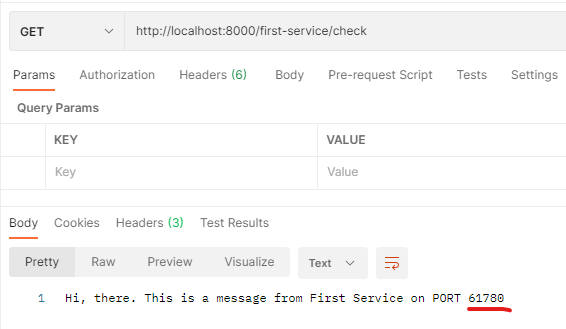
테스트 해보면 라운드 로빈 방식으로
한번씩 번갈아가면서 다른 포트를 호출한다.
참고로 당연하지만
http://localhost:8080/first-service/check 요청이 가능한건
apigateway-service에 first-service/** 가 들어오면 uri : lb://MY-FIRST-SERVICE 를 적어서 이름으로 찾았기 때문이다.
당연히 lb://MY-SECOND-SERVICE도 등록했기때문에 된다.